LSTM应用场景以及pytorch实例
Table of Contents
在去年介绍的一篇paper中,应用了多任务RNN来解决问题,当时RNN指的即是LSTM。本文介绍LSTM实现以及应用。
1. LSTM简介 #
循环神经网络要点在于可以将上一时刻的信息传递给下一时刻,但是在需要长程信息依赖的场景,训练一个好的RNN十分困难,存在梯度爆炸和梯度消失的情况。LSTM通过刻意的设计来解决该问题。
简单的RNN网络中重复的模块只有一个简单的结构,例如一个relu层,而在LSTM中重复的模块拥有4个不同的结构相互交互来完成。

1.1 首先决定从cell中丢弃什么信息 #
$$f_t = \sigma(W_f*[h_{t-1}, X_t] + b_f) \tag1$$ sigma函数在0到1选择代表丢弃与否
1.2 什么样的新信息存放到cell中 #
$$i_t = \sigma(W_i*[h_{t-1}, x_t] + b_i) \tag2$$
$$\widetilde{C_t} = tanh(W_c*[h_{t-1}, x_t] + b_c) \tag3$$
$$C_t = f_t*C_{t-1} + {i_t} * \widetilde{C_{t}} \tag4$$
4式中旧状态与$f_t$相乘,丢弃确定需要丢弃的信息,加上新的候选值。可以看到假如遗忘门一直为1,就可以保持以前的信息$C_{t-1}$
1.3 输出结果 #
$$o_t = \sigma(W_o[h_{t-1}, x_t] + b_o)\tag5$$ $$h_t = o_t*tanh(C_t)\tag6$$
2. LSTM实例以及Pytorch实现 #
循环神经网络可以应用到以下场景。
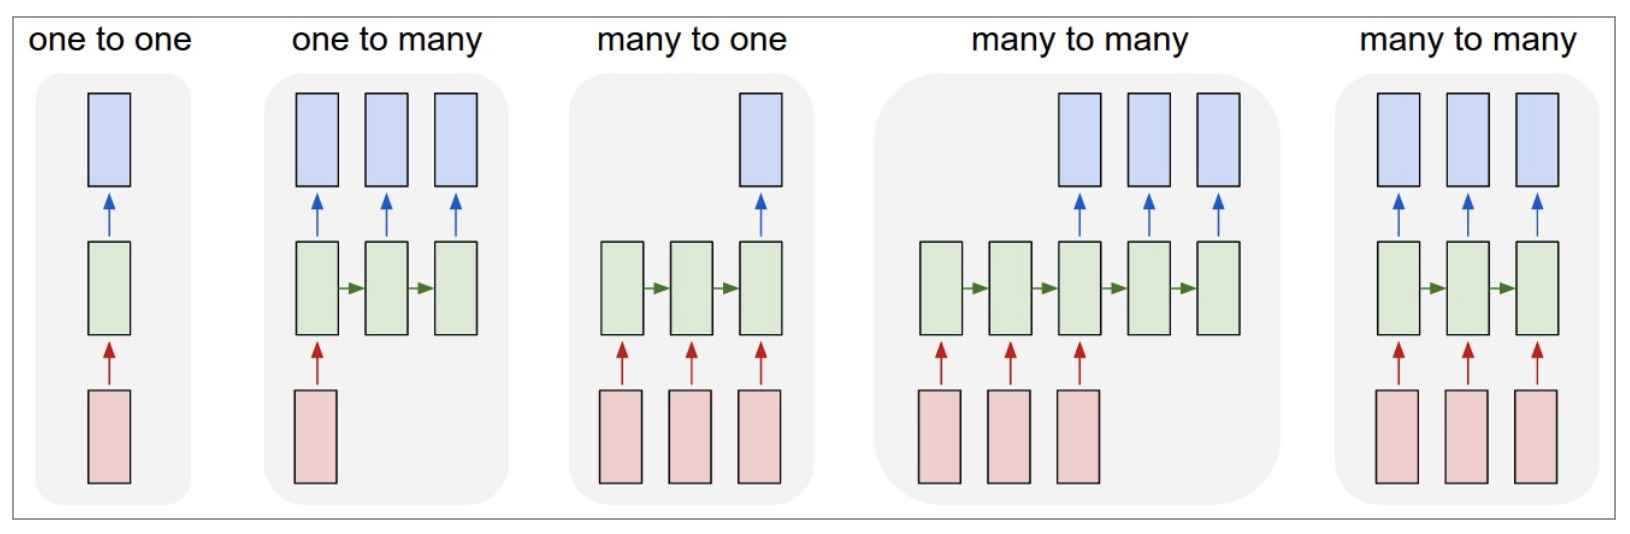
- 点对点(单个图片(文字)被分类;图像分类)
- 点对序列(单个图像(文字)被分为多个类;图像输出文字)
- 序列分析(一系列图片(文字)被分类;情感分析)
- 不等长序列对序列(机器翻译)
- 等长序列对序列(视频帧分类)
举两个例子:图像分类以及时间序列预测
2.1 LSTM图像分类 #
关于图片分类常用卷积神经网络,侧重空间上处理;而循环神经网络侧重序列处理。但是也能用来图片分类。第一个例子以常用的mnist手写字体识别为例。
2.1.1 导入所需用到的包以及超参数设置等 #
# Setup
import torch
from torch import nn
from torch.utils.data import DataLoader
import torchvision.datasets as dsets
import torchvision.transforms as transforms

torch.manual_seed(1)

# Device configuration
device = torch.device('cuda' if torch.cuda.is_available() else 'cpu')
2.1.2 导入数据集 #
# Mnist手写数字
train_data = dsets.MNIST(root='./mnist/',    # 保存或者提取位置
                         train=True,  # this is tra`ining data
                         transform=transforms.ToTensor(),    # 转换 PIL.Image or numpy.ndarray 成
                                                    # torch.FloatTensor (C x H x W), 训练的时候 normalize 成 [0.0, 1.0] 区间
                         download=True,          # 没下载就下载, 下载了就不用再下了改成False
)

test_data = dsets.MNIST(root='./mnist/',
                        train=False,
                        transform=transforms.ToTensor())

# Dataloader
# PyTorch中数据读取的一个重要接口,该接口定义在dataloader.py中,只要是用PyTorch来训练模型基本都会用到该接口(除非用户重写…),
# 该接口的目的:将自定义的Dataset根据batch size大小、是否shuffle等封装成一个Batch Size大小的Tensor,用于后面的训练。
train_loader = DataLoader(dataset=train_data,
                          batch_size=batch_size,
                          shuffle=True) # 在每个epoch开始的时候,对数据重新打乱进行训练。在这里其实没啥用,因为只训练了一次

test_loader = DataLoader(dataset=test_data,
                         batch_size=batch_size,
                         shuffle=False)
2.1.3 建立模型 #
# LSTM
# __init__ is basically a function which will "initialize"/"activate" the properties of the class for a specific object
# self represents that object which will inherit those properties
class simpleLSTM(nn.Module):
    def __init__(self, input_size, hidden_size, num_layers, num_classes):
        super(simpleLSTM, self).__init__()
        self.hidden_size = hidden_size
        self.num_layers = num_layers
        self.lstm = nn.LSTM(input_size, hidden_size, num_layers, batch_first=True)
        self.fc = nn.Linear(hidden_size, num_classes)

    def forward(self, x):
        # x shape (batch, time_step, input_size)
        # out shape (batch, time_step, output_size)
        # h_n shape (n_layers, batch, hidden_size)
        # h_c shape (n_layers, batch, hidden_size)
        # 初始化hidden和memory cell参数
        h0 = torch.zeros(self.num_layers, x.size(0), self.hidden_size).to(device)
        c0 = torch.zeros(self.num_layers, x.size(0), self.hidden_size).to(device)

        # forward propagate lstm
        out, (h_n, h_c) = self.lstm(x, (h0, c0))

        # 选取最后一个时刻的输出
        out = self.fc(out[:, -1, :])
        return out

model = simpleLSTM(input_size, hidden_size, num_layers, num_classes)

# loss and optimizer
criterion = nn.CrossEntropyLoss()
optimizer = torch.optim.Adam(model.parameters(), lr)
2.1.4 训练模型 #
# train the model
# 关于reshape(-1)的解释 https://www.zhihu.com/question/52684594
# view()和reshape()区别的解释 https://stackoverflow.com/questions/49643225/whats-the-difference-between-reshape-and-view-in-pytorch

# Hyper Parameters
epochs = 1           # 训练整批数据多少次, 为了节约时间, 我们只训练一次
batch_size = 64
time_step = 28      # rnn 时间步数 / 图片高度
input_size = 28     # rnn 每步输入值 / 图片每行像素
hidden_size = 64
num_layers = 1
num_classes = 10
lr = 0.01           # learning rate

total_step = len(train_loader)
for epoch in range(epochs):
    for i, (images, labels) in enumerate(train_loader):
        images = images.reshape(-1, time_step, input_size).to(device)
        labels = labels.to(device)

        # forward pass
        outputs = model(images)
        loss = criterion(outputs, labels)

        # backward and optimize
        optimizer.zero_grad()
        loss.backward()
        optimizer.step()

        if i % 100 == 0:
            print('Epoch [{}/{}], Step [{}/{}], Loss: {:.4f}'
                   .format(epoch+1, epochs, i+1, total_step, loss.item()))
2.1.5 测试模型 #
# Test the model
# https://stackoverflow.com/questions/55627780/evaluating-pytorch-models-with-torch-no-grad-vs-model-eval
# torch.max()用法。https://blog.csdn.net/weixin_43255962/article/details/84402586
model.eval()
with torch.no_grad():
    correct = 0
    total = 0
    for images, labels in test_loader:
        images = images.reshape(-1, time_step, input_size).to(device)
        labels = labels.to(device)
        outputs = model(images)
        _, predicted = torch.max(outputs.data, 1)
        total += labels.size(0)
        correct += (predicted == labels).sum().item()

    print('Test Accuracy of the model on the 10000 test images: {} %'.format(100 * correct / total))
2.2 时间序列预测 #
Todo
2.3 图像输出文字 #
Todo
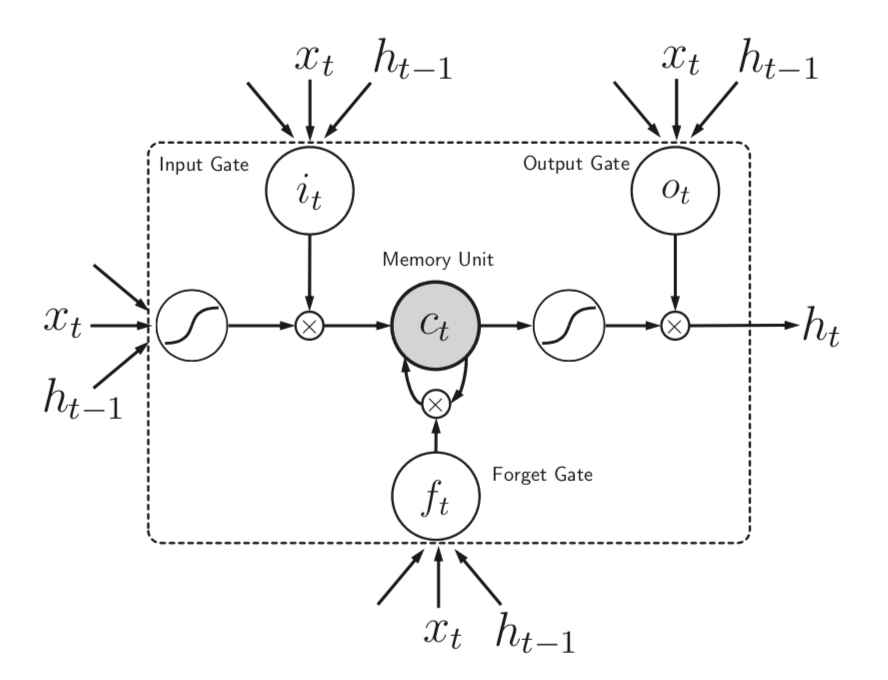
补充 #
在原始发表文献用的图示是类似于下图的这种,看起来比较好容易理解当初形成LSTM的原因
pytorch lstm函数用法示例
rnn = nn.LSTM(10, 20, 2) # input_size, hidden_size, num_layers
input = torch.randn(5, 3, 10) # time_step, batch, input_size(这里input_size即features)
h0 = torch.randn(2, 3, 20) # num_layers, batch, hidden_size
c0 = torch.randn(2, 3, 20) # num_layers, batch, hidden_size
output, (hn, cn) = rnn(input, (h0, c0)) # output包含从最后一层lstm中输出的ht。shape: time_step, batch, hidden_size
hidden_sizeis the number of units of your LSTM cell. This means all the layers (input, forget, etc.) will have this sizehidden_size即pytorch隐含层每个结构中含有的隐含cell数目
- lstm函数中加入
bidirectional=True参数即双向神经网络
Reference #
- 理解LSTM(http://colah.github.io/posts/2015-08-Understanding-LSTMs/)
- 高效RNN(http://karpathy.github.io/2015/05/21/rnn-effectiveness/)
- Hochreiter & Schmidhuber (1997) LSTM
- Pytorch LSTM官方文档(https://pytorch.org/docs/stable/nn.html#lstm)